Wednesday, May 25th
Pyrography is "the art or technique of decorating wood or leather by burning a design on the surface with a heated metallic point". Also known as wood-burning, it can be done on clay, leather, or gourds!
Continuing with my goal of using a variety of media, I researched pyrography and my mom bought me some wood-burning tools (thank you Mom <3).

The wood-burning pen was about $30 and came with a few different metal tips to create various lines and marks. It's super easy to use because it's just like you are drawing, but as you draw, it burns into the wood.
In the past this technique was sometimes used to personalize things like wooden instruments then the style later evolved to become more decorative. Its reall amazing how realistic it can look.

In the past this technique was sometimes used to personalize things like wooden instruments then the style later evolved to become more decorative. Its reall amazing how realistic it can look.
Below is a list of materials people have used with the wood-burning technique.
animal bone/skull
wooden egg
candle holder
spoon/utensils/dishes
phone case
necklace pendant
leather workboots/ belt
I made a lily...it was the first thing I made and only took about 30 minutes. My choice to produce nature-related pictures on the wood is ironic. A tree was cut down and killed, which in my opinion makes the world less beautiful. However, I took that wood from a tree and recycled it into something beautiful that people can enjoy again.
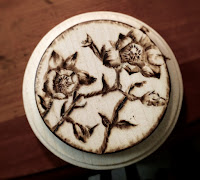

The one on the right is of little flowers from a tree branch. I started out wanting to do a snake on this piece of wood, but I didn't like the way it was turning out and had to research how to erase wood-burning. Basically, you just sand off the layer that you burnt into and start over.
I made these two as experiments in pyrography, but I hope to get much better in the future(: There are so many amazing pictures online of portraits people have created on wood; they are so inspiring to me and I want to be able to do the same.
Finally, Mr. Gledhill my art teacher helped me to pick out a glaze for my box mentioned in an earlier post. The glaze was basically iron rust that you mix with water and then paint onto the already fired piece. After that, you take a wet sponge and wipe off some of the glaze to give it an earthy, rustic look. I am really happy with the way it turned out and it looks especially cool with the succulent. (:
 |
| AFTER |
 |
| BEFORE |
No comments:
Post a Comment